
Tired of outdated, rusted, or dim bathroom lighting? What if you could replace your old 3-bulb fixture with a modern, elegant, 4-light vanity light—for less than $40, with free shipping and no tax?
That’s exactly what one savvy DIYer discovered when comparing a nearly identical model at Home Depot (priced at $80). And the best part? It’s not just cheap—it’s stunningly stylish, energy-efficient, and surprisingly easy to install.
In this in-depth guide, we’ll walk you through:
A full review of the Hardware vanity light
Step-by-step DIY installation instructions
How to repair damaged drywall if your old fixture left a mess
Bulb recommendations, dimensions, and styling tips
Pro tricks to ensure a seamless, professional finish
Whether you’re a weekend warrior or a first-time DIYer, this fixture could be your bathroom’s glow-up secret.
🔍 Why This Vanity Light Stands Out
Before we dive into installation, let’s break down why this fixture is a hidden gem:
Finish: Brushed nickel—timeless, corrosion-resistant, and matches modern faucets
Design: 4-light configuration with frosted decorative glass shades that diffuse light beautifully
Bulb Compatibility: Accepts 60W max bulbs (we recommend 8W LED daylight bulbs for efficiency + brightness)
Dimensions: 28″ wide × 8.5″ tall × 7.5″ depth—ideal for standard vanities and mirrors
Versatility: Can be mounted right-side up or upside down based on your style preference
📏 Step 1: Measure Your Space (Avoid Costly Mistakes!)
Before ordering or installing, measure twice:
Mirror Width: Note the total width (e.g., 36”)
Ideal Fixture Width: Should be 70–80% of mirror width → For a 36” mirror, 25–29” is perfect. This 28” fixture fits flawlessly.
Mounting Height: Typically 18–24” below the top of the mirror or 72–78” from floor to center of fixture
Clearance: Ensure 7.5” depth won’t hit medicine cabinets or shelves
📐 Pro Tip: Use painter’s tape to outline the fixture on your wall before buying. It prevents “too big/too small” regrets!
⚠️ Step 2: Safety First — Cut Power & Prep Your Workspace
Never skip this step!
Turn OFF the light switch
Flip the correct circuit breaker (label it if unsure)
Use a non-contact voltage tester to confirm wires are dead
Set up a work light (e.g., LED lamp on extension cord from another room)
💡 Why? Bathroom circuits are often GFCI-protected and near water—extra caution prevents shocks.
🔧 Step 3: Remove Your Old Fixture (Even If It’s Rusty!)
Most older fixtures (like the 20-year-old one in the video) are held by:
Chrome decorative rings around bulbs → Wiggle gently to pop off
Phillips screws behind the cover → Remove to release front casing
Mounting screws + ground wire on backplate → Unscrew all
Once loose, disconnect wires:
Black (hot) → Black
White (neutral) → White
Copper/green (ground) → Green screw or bare wire
Carefully lower the old fixture and set aside.
🛠️ Warning: If your wall looks like the video—cracked, uneven, or damaged—don’t panic. We’ll fix it in Step 5!
🛠️ Step 4: Install the New Mounting Bracket
Hold the mounting bracket against the wall at your marked center point.
Use a level to ensure it’s perfectly horizontal.
Drill pilot holes if needed.
Secure with included screws into wall studs (ideal) or drywall anchors (if no stud).
🔩 Critical: If your old fixture left a hole or weak drywall (like in the video), reinforce first (see next section).
🧱 Step 5: Repair Damaged Drywall (For a Seamless Finish)
If your wall is cracked, uneven, or has large gaps (common after removing old fixtures), follow this pro repair method:
A. Reinforce the Mounting Area
Cut a 2×4 wood block slightly longer than the fixture width
Insert into wall cavity and screw through drywall into the block (creates solid backing)
For large gaps, add wood strips + drywall patches
B. Apply Joint Compound
Use all-purpose joint compound (e.g., “All-Purpose Back Lawn” as mentioned)
Apply 3 thin layers, sanding with 120-grit sandpaper between coats
Feather edges to blend with surrounding wall
C. Texture & Paint
Spray orange peel or knockdown texture to match existing wall
Once dry, paint with matched wall color using a small roller
Result: Nearly invisible repair!
🎨 Time-Saver: If your wall is intact, skip this step! Most users won’t need it.
⚡ Step 6: Wire the New Fixture (Black to Black, White to White)
Match wires:
Black (fixture) → Black (house)
White (fixture) → White (house)
Green/bare (fixture) → Copper ground or green screw
Twist wires clockwise, then secure with wire nuts
Tug gently to confirm tight connection
Neatly tuck wires into the electrical box
🔌 LED Tip: Use daylight (5000K–6500K) bulbs for bright, clean illumination—ideal for makeup, shaving, and grooming.
💎 Step 7: Mount the Fixture & Attach Glass Shades
Slide the fixture base onto the mounting bracket
Tighten the central setscrew (or “ball joint”) to lock it flush to the wall
Double-check level—adjust if needed
Insert bulbs (don’t overtighten!)
Slide frosted glass shades over each bulb
Secure with rubber washers to prevent rattling
✨ Styling Note: Mount upside down for a more dramatic, upward-glow effect—perfect for ambient lighting!
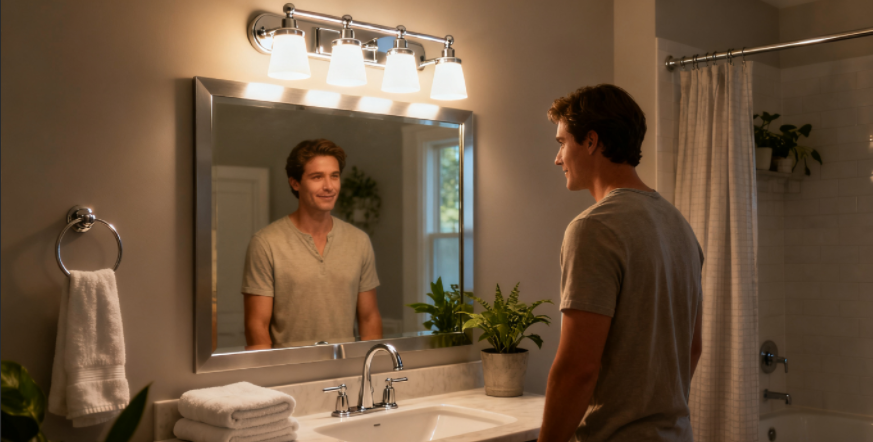
💡 Final Result: Bright, Modern, and Budget-Friendly
![Image Prompt: Finished bathroom with the 4-light nickel vanity fixture glowing above a mirror. Clean sink, folded towels, plants. Daylight LEDs casting even, shadow-free light. Style: lifestyle photography, warm-cool balanced lighting.]
Flip the breaker, turn on the switch—and voilà! You’ve transformed your bathroom with:
Even, shadow-free lighting (thanks to 4 bulbs + frosted glass)
Modern brushed nickel finish that resists water spots
Energy savings (4 × 8W LEDs = 32W total vs. 240W for incandescent!)
Professional look for under $50 (fixture + bulbs)
❓ Frequently Asked Questions (FAQ)
Q: Is this fixture damp-rated for bathrooms?
A: Yes! The frosted glass and sealed design make it suitable for damp locations (not directly in shower steam, but perfect for vanity areas).
Q: Can I use smart bulbs?
A: Absolutely! Any E26-base smart LED (Philips Hue, Wyze, etc.) will work.
Q: What if my junction box isn’t centered?
A: Use an adjustable mounting bracket or reposition the box (may require electrician). Alternatively, center the fixture visually and accept slight wire strain (not ideal).
Q: How do I clean the frosted glass?
A: Wipe with microfiber cloth + mild soapy water. Avoid ammonia-based cleaners.
🌟 Why This Fixture Is a Game-Changer
This isn’t just a cheap light—it’s a high-value upgrade that proves you don’t need to spend $100+ for elegance. With its:
Balanced proportions (28” width fits most mirrors)
Premium look (brushed nickel + frosted glass)
Easy installation (standard wiring, no special tools)
Energy efficiency (LED-ready)
…it’s perfect for renters, homeowners, and DIYers alike.
And if your wall needs love? The drywall repair method shared here turns a “weekend project” into a pride-worthy renovation.